How to Use
Check before use
Below are the recommended environmental conditions for the robot's operation.
The optimal operating temperature range for the robot is 50 – 95 ̊F (10 – 35C), and the optimal humidity range is 10 – 80%.
Use the robot in an indoor space with no moisture and good ventilation.
Use the robot on a flat floor without vibrations or risk of shocks.
Clear the path of the robot's movement.
Coverage - Space and Recognition
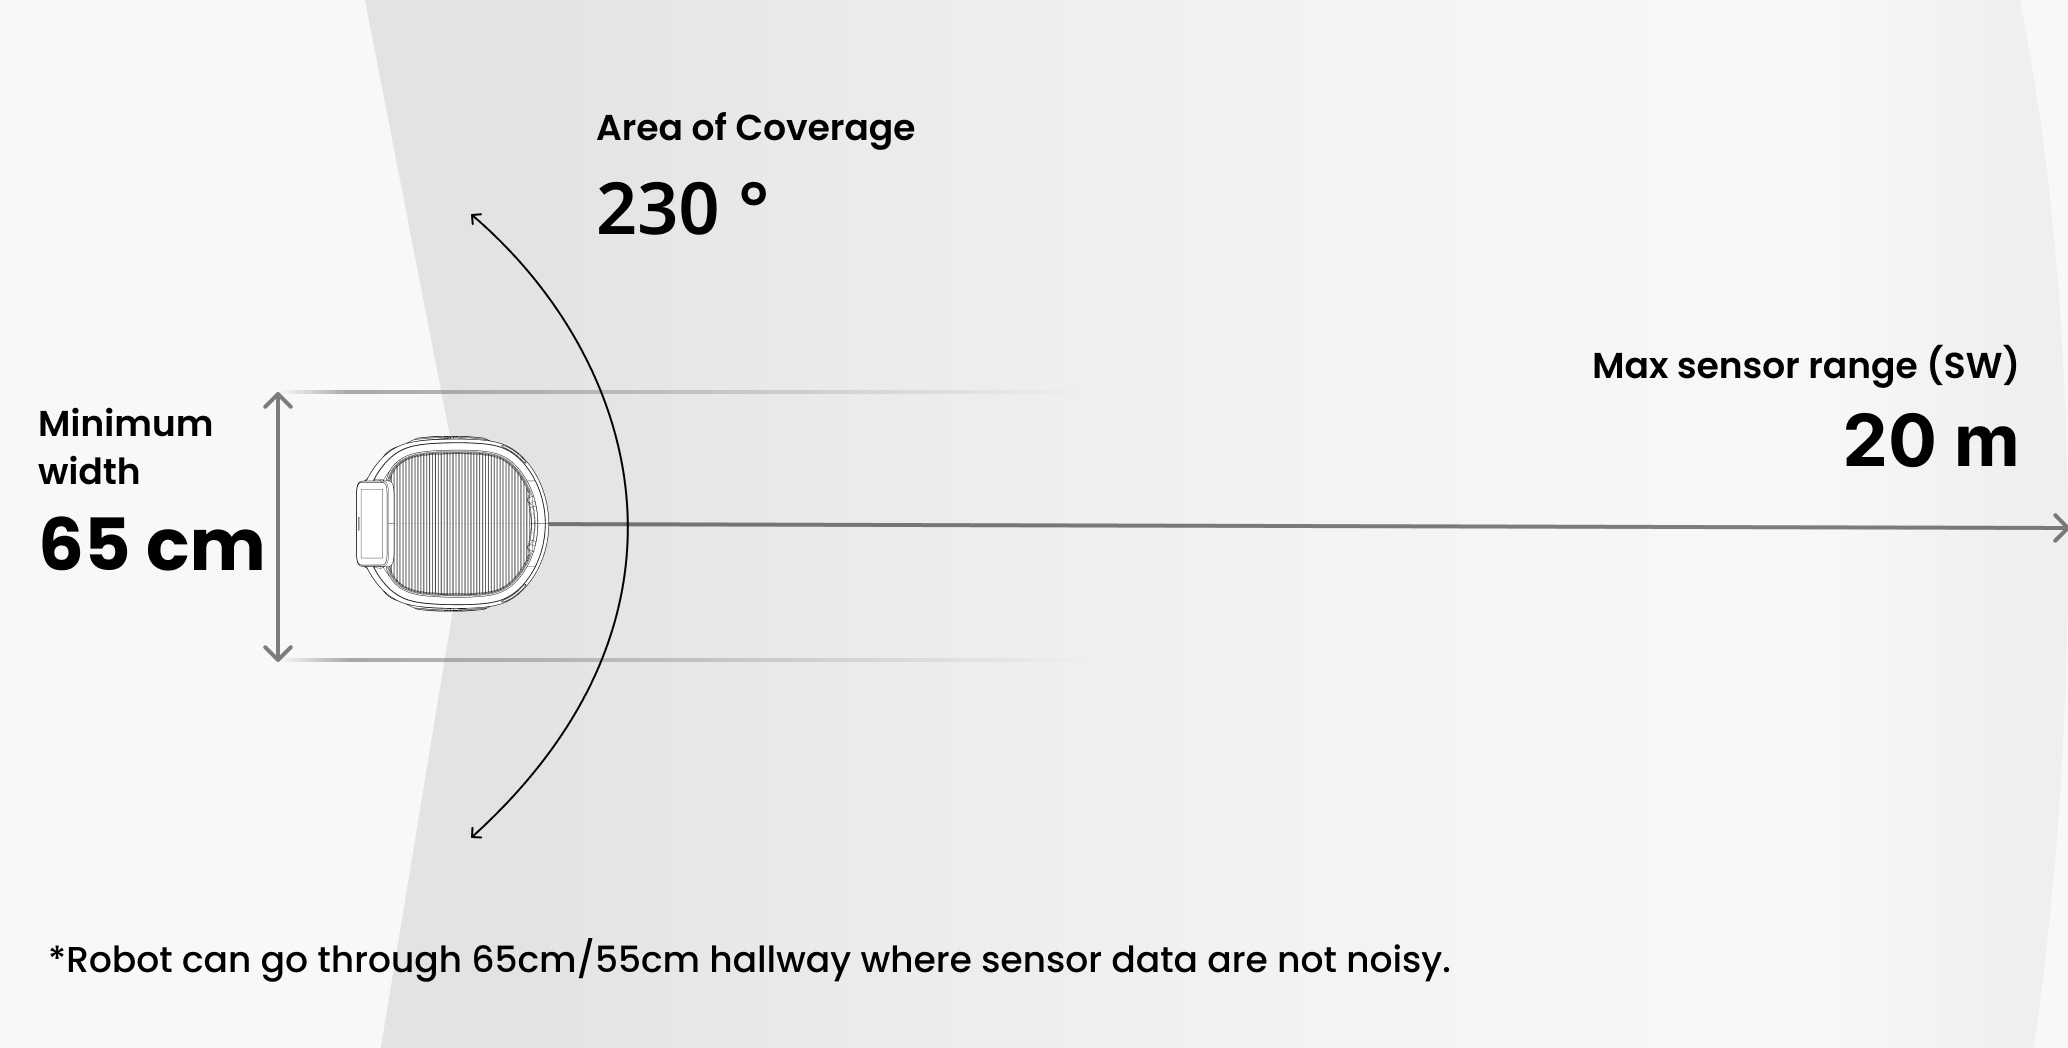
Below is the robot’s coverage including the minimum range of movement and recognition.
The minimum path clearance width for the robot’s passing is 25.6 in (65 cm).
Make sure to leave enough space for the robot to move safely.The robot uses a 2D LiDAR sensor and a 3D depth sensor to detect objects and calculate the distance to and location of objects.
– The 2D LiDAR (Light Detection and Ranging) detects surrounding objects and measures information such as distance, direction, and speed to the target. The maximum measurement range of the 2D LiDAR is 65.6 ft (20 m) with 230° of coverage.
– The 3D depth sensor measures the distance to surrounding objects. The measurement range of the 3D depth sensor is 8.2 ft (2.5 m).
Since obstacles placed outside the camera's measurement range or sensor's recognition range are difficult for the robot to detect, make sure to remove them from the robot's path.
Examples of obstacles that the robot may have difficulty detecting include:– Small objects with a thickness of less than 2 in (5 cm), small bumps or steps on the floor
– Objects hanging or floating in the air such as lighting fixtures or mobiles
– Objects made of mirrors or glass materials
Turning On/Off
You can find the power button of the robot at the bottom right of its body.
Open the charging cover and press the black power button on the left to turn on the robot.
The boot screen is displayed on the touch screen, and the pillar light and base LEDs will light up.
To turn off the robot, press and hold the power button for 5 seconds.
Charging the Robot
The below instructions describe how to charge the robot battery.
[Caution]
Make sure to use the provided charging adapter and components to charge the battery. Failing to do so can lead to damage to the robot or battery.
It is recommended to charge the battery in a location where the power plug can be easily disconnected in case of an emergency.
| Battery Level
The battery level can be checked in the top right corner of the screen.
When the battery is low, the message “Low Battery” will appear on the screen with a voice prompt.
| How to Charge
Open the charging cover at the bottom of the robot's main body.
Insert the charging adapter into the charging terminal of the robot, and plug the power plug into the outlet. Connect the charger and turn it to the right. If it clicks then it starts charging.
※ Servi and Servi Plus can share the same charger.
E-stop
In case an object or person suddenly appears in front of the robot, please press the E-stop button.
Activating the E-stop will cause the wheels to lock.
To release the E-stop, turn the E-stop button to the right (arrow) direction.
After releasing the E-stop, any ongoing mission will be canceled, and the touch screen will display “Mission Failed”. Return to the home screen by pressing the Go to Home button and deliver the robot by entering a new destination. This will release the wheel lock.
If the robot malfunctions or produces strange sounds, smells, or smoke, press the E-stop button and press and hold the power button for 5 seconds.
Using Trays
Four trays are provided with the robot by default, but the number and location of the trays can be changed. You can ask our installation engineer to change the number of trays.
[Note]
Please do not change the tray location arbitrarily. It can cause a malfunction.
About Lights
Located nearby the upper-most tray, the 3-Sided Custom Display displays guidance messages.
| 3-Sided Custom Display
It helps to identify the tray with the ordered food. Upon the robot's arrival at the table, the lighting on both sides of the tray containing the customer's ordered food will turn on.
| Pillar light
Each tray has lighting installed to help users easily recognize their servings. The tray lighting turns on when food is loaded.
| Food light
It is located at the bottom of the robot, and the color of the base LED changes per the robot's operational status.
| Base LED
[Base LED Color]
Booting
Stand by
Under operation
E-stop
Charging
Fully charged
Deadlock
Multi-Robot
Rainbow
Blue
Green
Red
Yellow
Green
Orange
Purple
Using Servi Plus
| Preparing for Use
To use the robot, you must have registered the robot and completed the mapping process by following the touchscreen instructions. Bear Robotics offers a cloud-based service that includes robot monitoring, robot workflow, robot guide, and troubleshooting measures anytime, anywhere. To install the robot, you will need to sign up for the Universe, the Servi management system. Please contact Bear Robotics, for the sign-up process.
To use the robot, you must register your robot and perform a mapping process. Please complete the initial setup by following the touchscreen instructions.
| Robot Initial Setting
Turn on the robot and register it by following the touchscreen instructions. Create a location in Universe and complete registration by entering the 4-digit code displayed on the touch screen.
○ Step 1. Register a Robot
Drive the robot around by following the touch screen instructions to allow it to map the floor with its cameras and LiDAR. Below is the mapping sequence.
○ Step 2. Start Mapping
You can add destinations on the touch screen or in Universe.
[Caution]
Place the robot towards a wall before pressing the Start mapping button. If the wall is transparent or the robot starts from another location, the resulting map image may have distortions.
Wrap up the mapping on the touch screen, select the Maps tab in Universe, and press Refresh (F5). You can see the map image and destination taken from the robot.
Specify tables, chairs, and restricted spaces in the toolbox to further define the range.
○ Step 3. Finish Mapping
Press and hold the robot name (2 – 3 seconds) on the left top of the touchscreen and go to the Settings screen.
○ Step 4. Go to Settings
Set the map and serving locations and move to Localization to make the robot understand where it is. Check that the destination matches the place where the robot is, press the destination, and press the Confirm button. Or you can press and hold the destination on the Home screen to relocate your robot.
○ Step 5. Localize a Robot
| Tray Selection Settings
Go to Settings > Advanced.
You can enable or disable tray selection depending on the serving conditions or your preferences.
Tray Selection
OFF: This is the default value. The robot delivers to the destination without a separate tray selection. The destination names are displayed in order.
ON: You can enable different trays for different destinations. Set up and move to the Home screen, and you can find a robot image appearing on the right where you can select a tray.
<Tray Selection: OFF>
<Tray Selection: ON>
Servi Plus helps with delivery and bussing in various modes. You can set it up for different modes including serving, bussing, etc. On the initial screen, the tray selection is off. To change the behavior, follow the instructions below.
○ Robot Workflow Default Screen
| Robot Workflow Settings
Go to Settings > Robot Workflow.
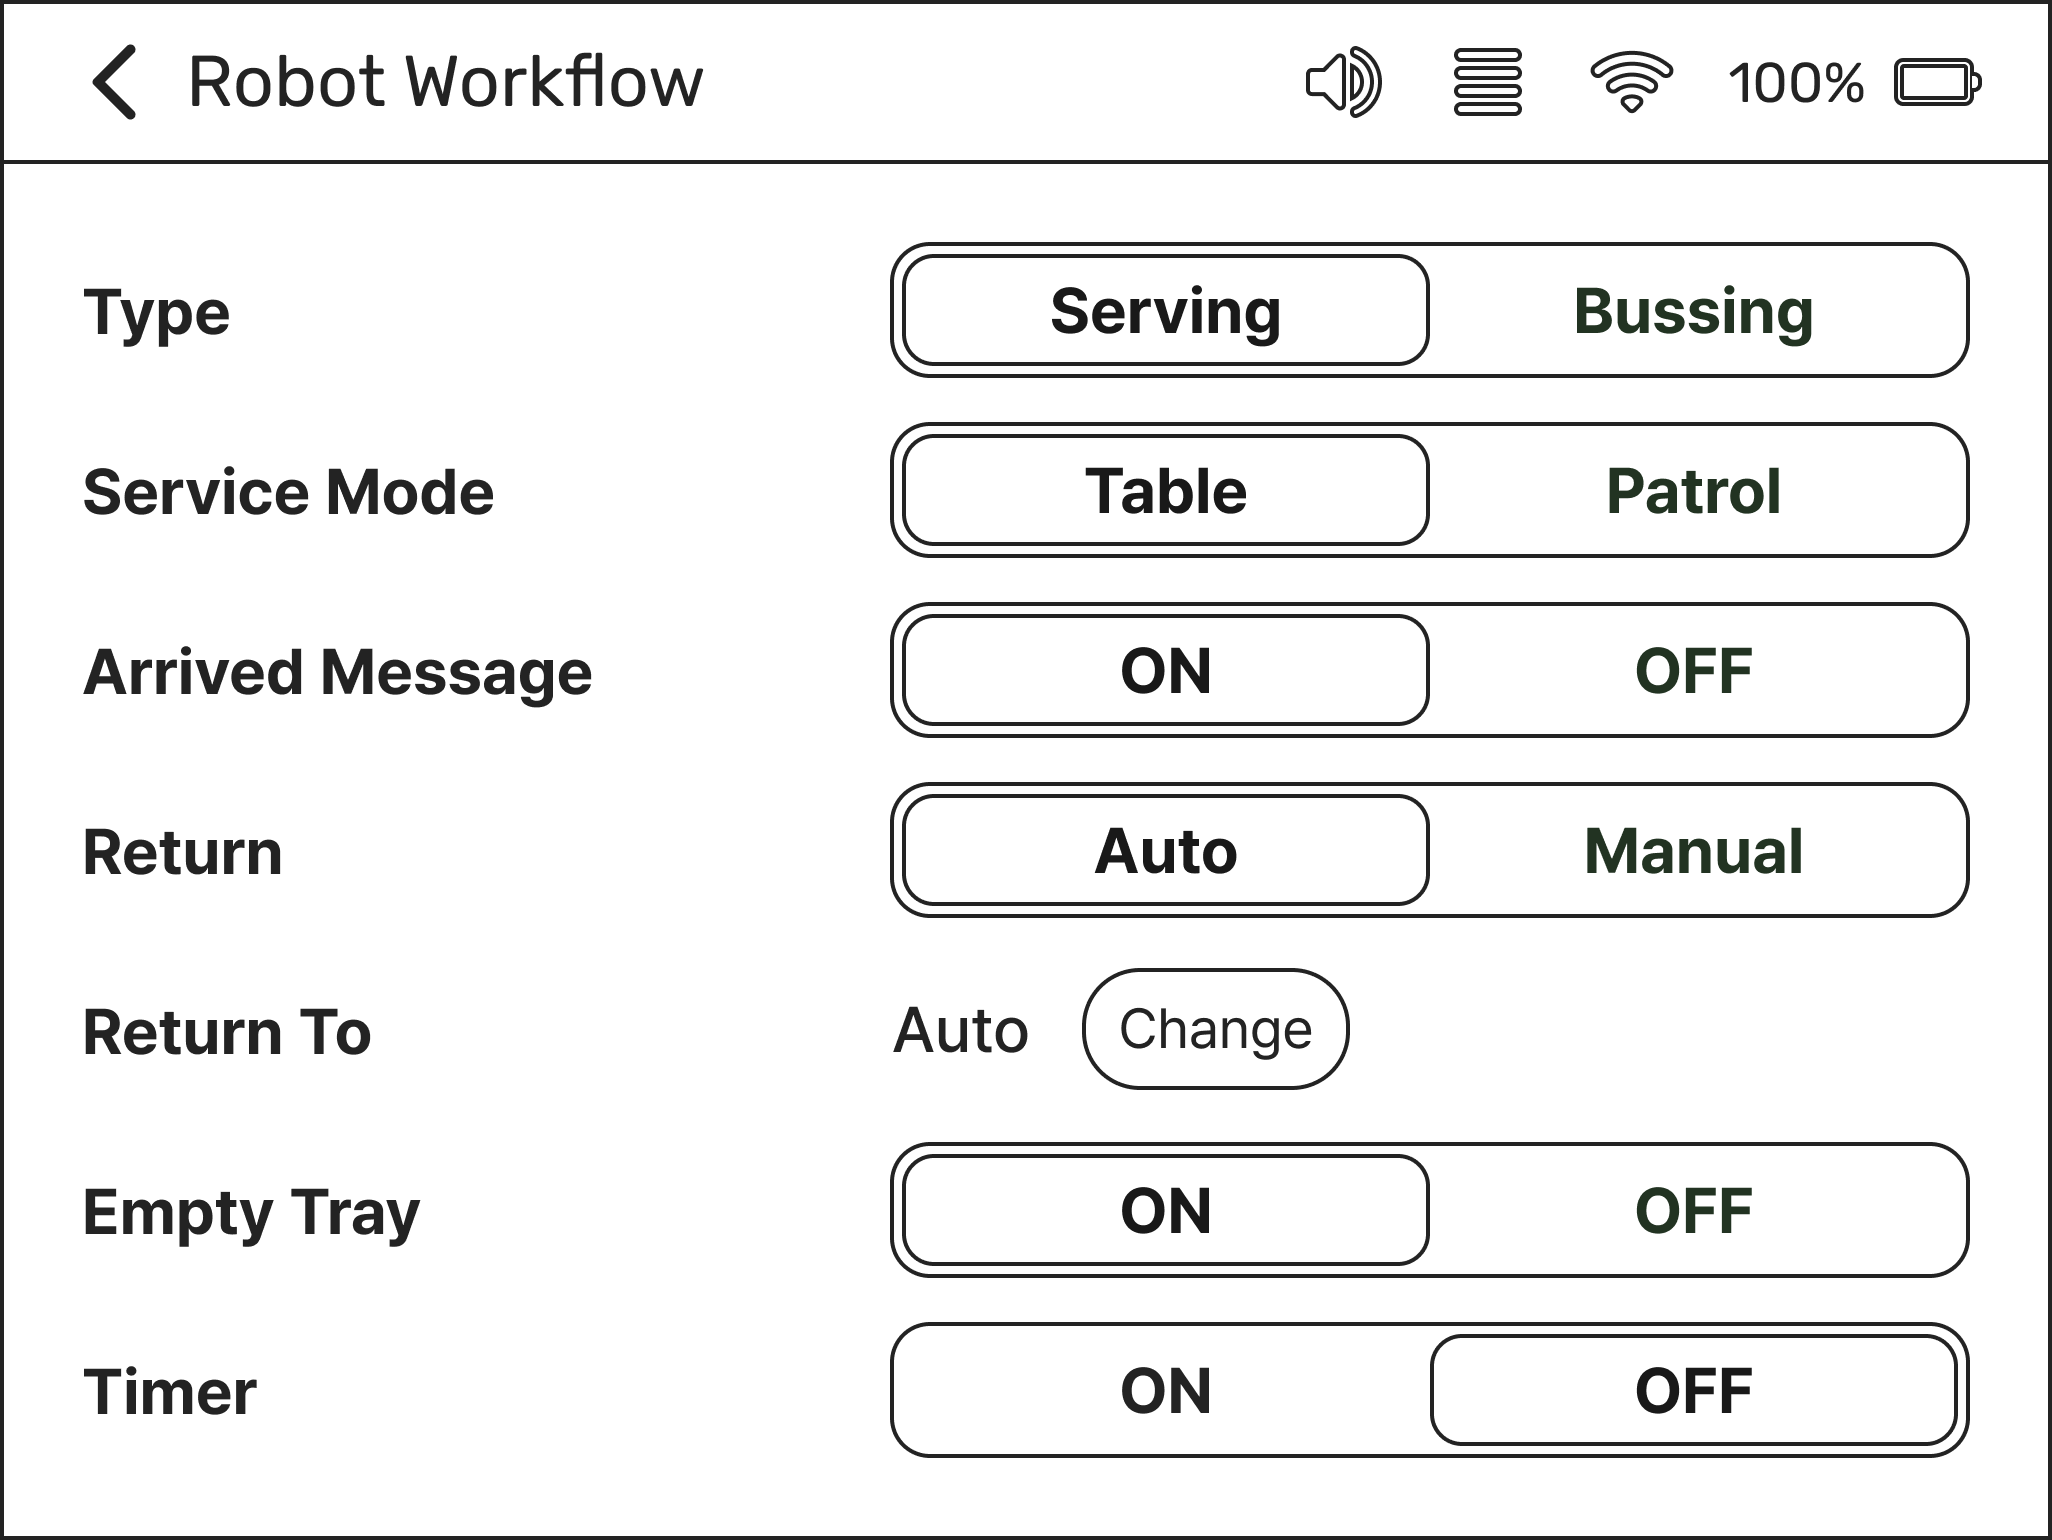
The image below shows the Robot Workflow screen with default settings.
-
Serving: It is a default value item.
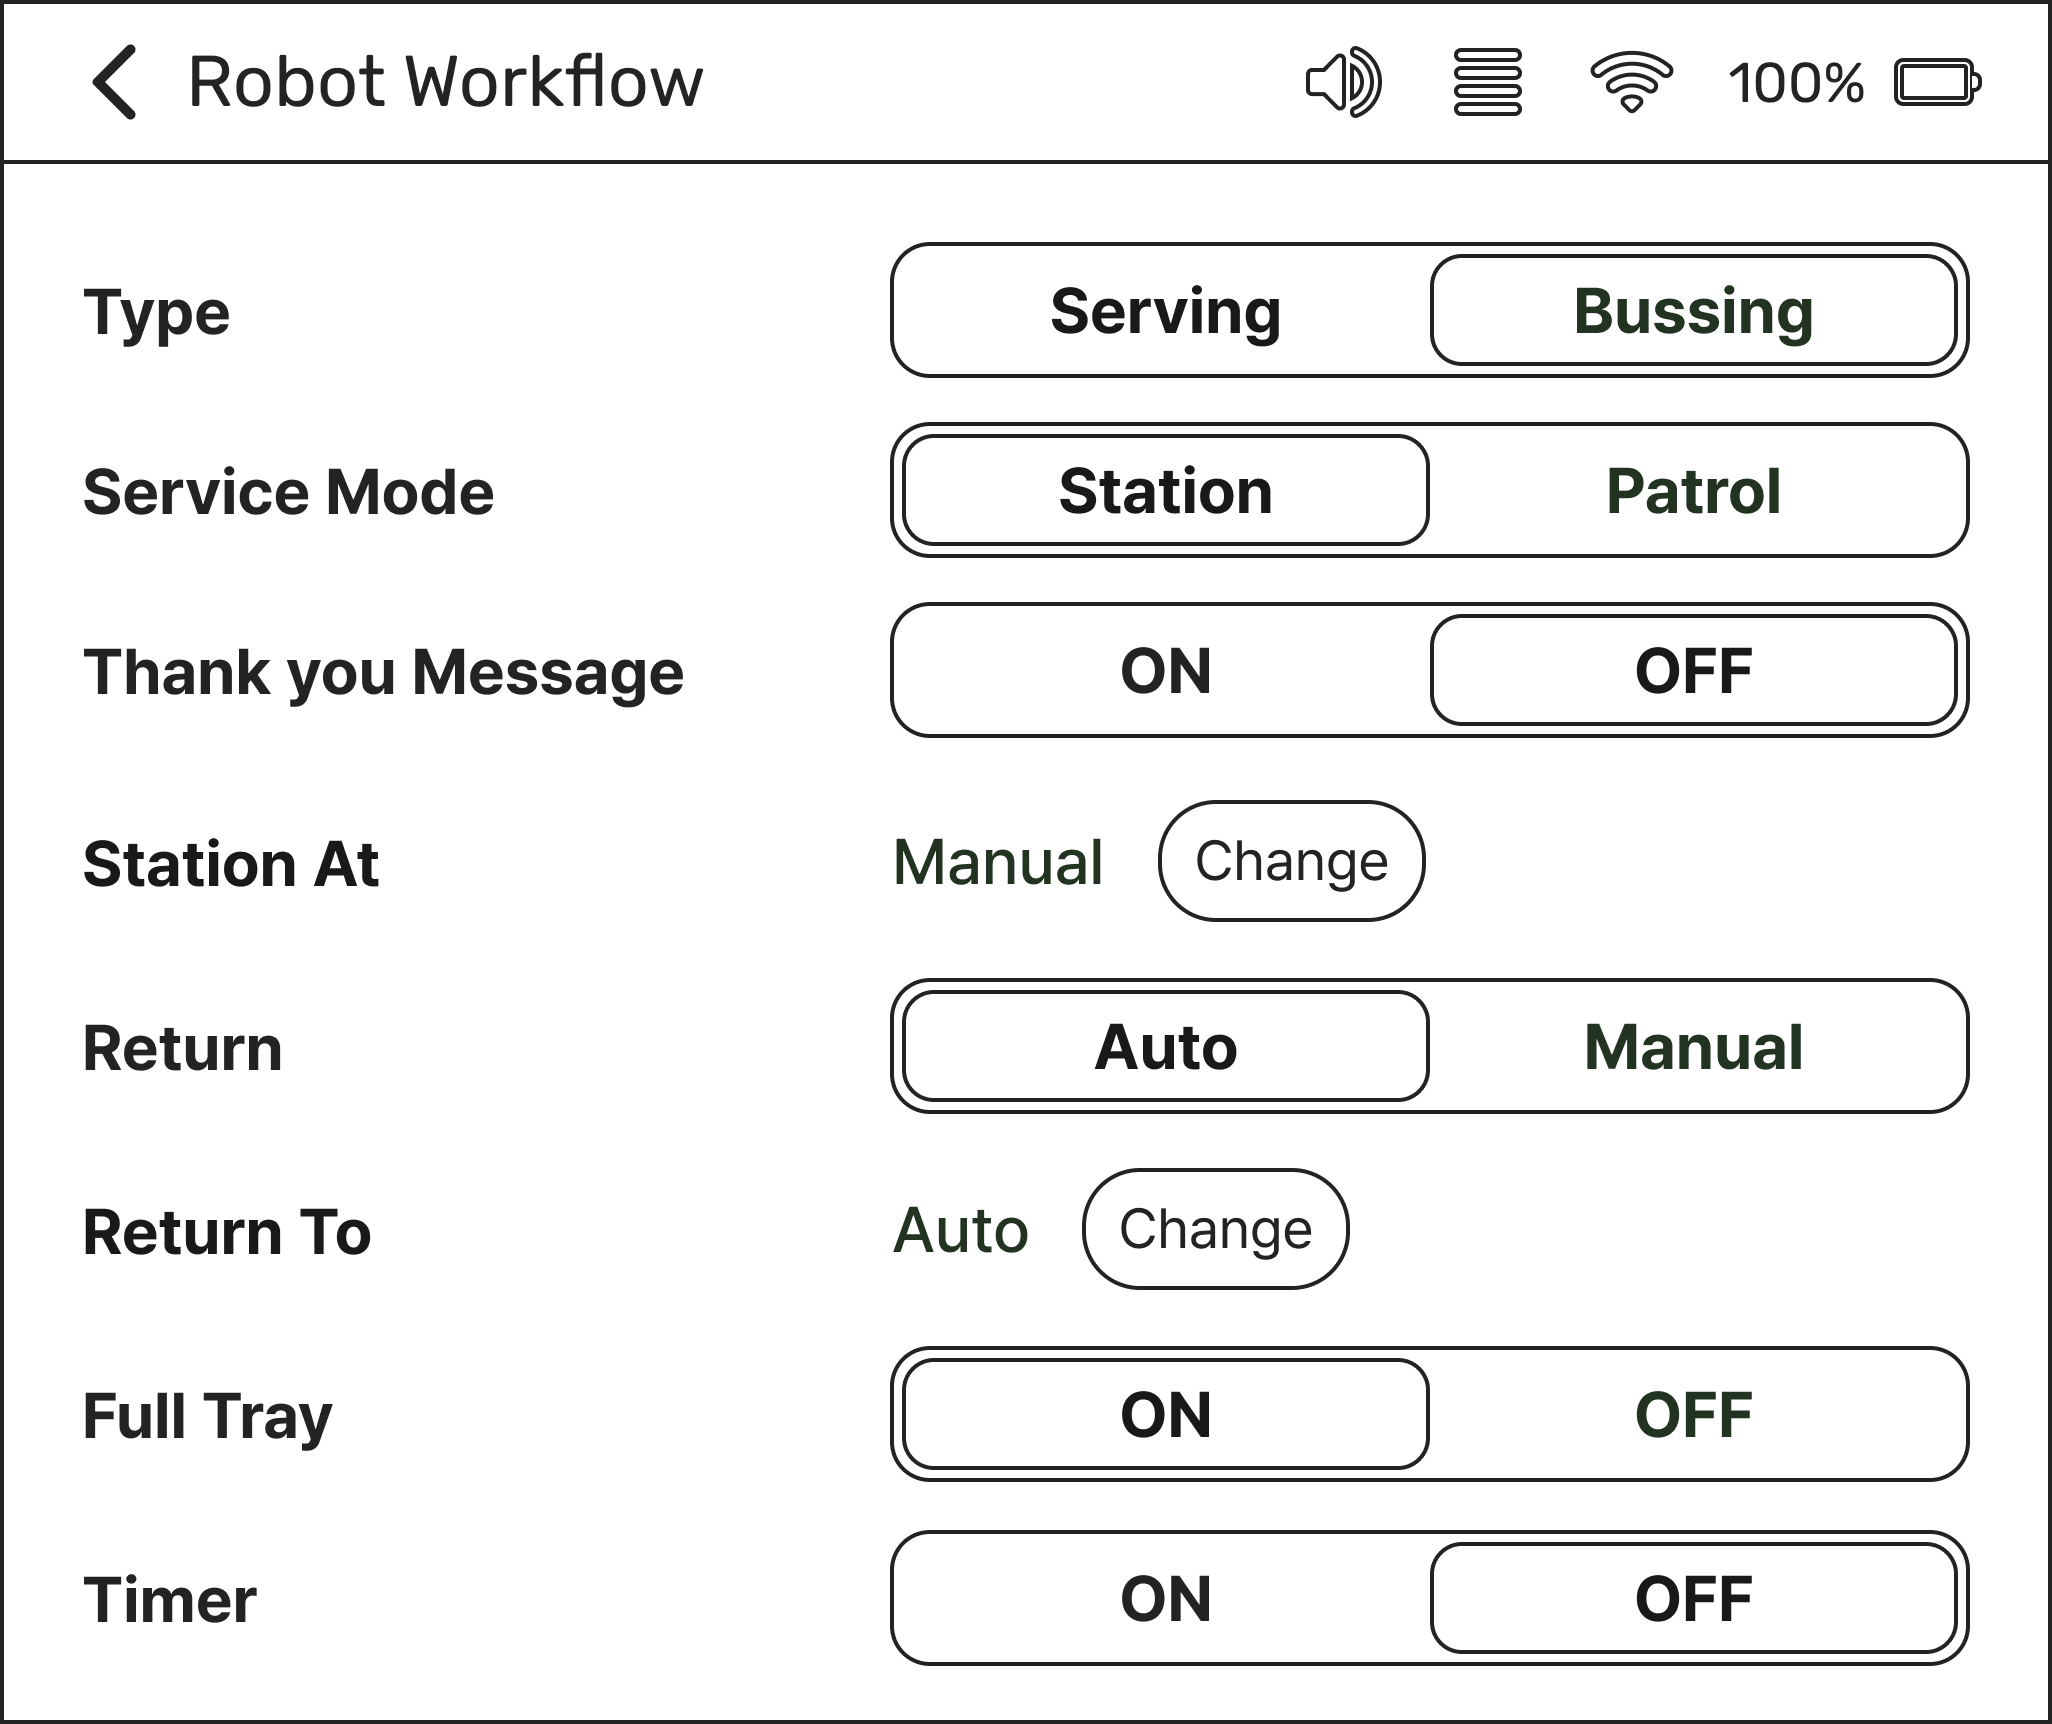
Bussing: Even if you have set tray selection, the robot image does not appear on the Home screen. If you enter a bussing destination, the destination names are listed on the right.
-
Table: It is a default value item.
Patrol: Even if you have set tray selection, the robot image does not appear on the Home screen. The destination names appear in order on the right. Selecting Patrol will disable the Return item.
-
When the robot arrives at the table, a voice prompt occurs saying “Please take your food”. You can turn it off by switching it to OFF.
-
This message is used in a bussing type or a station is selected in service mode.
If a user loads something on the tray and the robot detects the weight and a message prompt occurs saying “Thank you”. You can set it to ON/OFF.
-
Auto is set as default and moves to the designated Return To after all servings are complete.
-
It is displayed when the user selects the bussing type and then a station in service mode. You can specify Return To.
-
To change Return To to the other position, press Change and select a saved destination.
-
If it is turned ON, the robot starts the next delivery when the tray is unloaded.
-
The bussing type is changed from Empty Tray to Full Tray.
-
The timer defines how long the robot stays at a destination. To enable the timer, press ON and set Return After. You can turn it off by switching it to OFF.
-
The robot starts moving to the next destination after the designated Return After, which can be set using the timer.
Using Robot Workflow
| Serving
For information on features of Robot Workflow, refer to above Robot Workflow Settings.
The default Robot Workflow screen. Enter the destination and press the GO button.
○ Tray Selection OFF
The screen shows the default Robot Workflow screen with the Tray Selection ON. Enter the destination and press the GO button.
○ Tray Selection ON
The serving order is automatically assigned from top to bottom, but you can designate a serving destination by selecting the desired tray.
If you entered the wrong destination to the tray, press the tray again to enter the correct destination.
| Bussing
This is the Robot Workflow screen with default bussing mode.
-
The robot will move to a pre-defined station whenever it completes bussing.
-
If a user loads something on the tray and the robot detects the weight and a message prompt occurs saying “Thank you”. You can set it to ON/OFF. But the voice prompt occurs irrespective of this setting (whether ON or OFF), when the robot leaves the destination.
-
This feature designates specific points to be used as stations.
[Caution]
If Station At is set to Manual, the set points are not used.To use the station, press the Change button and set Station At.
When you complete Station At and move to the home screen, the station is displayed.
When a destination is selected, the station is entered as the last point.
-
The robot returns to the Return To location if it detects something with the weight sensor of more than 22 lb (10 kg) while bussing.
-
Define how long the robot stays at a destination. When it is set to OFF, the robot will stay at the destination until the tray is full while bussing. The Skip button allows the robot to move or return to the next location.
| Setting Routes
Setting Routes will enable Patrol in the Robot Workflow service mode.
Press and hold the upper left corner of the screen for 2 – 3 seconds.
Go to the Settings screen.
Press GENERAL at the top left of the screen.
Press Create Routes to go to the route creation screen. Create a route by following the on-screen instructions.
After creating the route, return to the previous screen and set Routes to ON.
○ Setting
Press the destinations to enter the route in order.
If you find any wrong destination, you can delete it by pressing ‘X’ button right next to the destination name.
After entering all destinations, press SAVE.
After entering the route name, press SAVE.
The Home screen appears and the created route will be displayed at the left top.
○ Creating
You can change the route name.
On the Creating Routes screen, press ( - ) Button at the bottom left.
Press the route you wish to rename and press EDIT.
Enter the route name and press SAVE.
○ Editing
You can delete routes.
On the Creating Routes screen, press ( - ) Button at the bottom left.
Press the route you wish to delete and press DELETE.
A confirmation message appears.
Select the right check box to proceed.
Press the left X button to cancel the deletion.
○ Deleting
Status Messages
A status message appears on the screen when the robot cannot perform a mission due to an obstacle in the path or when a position error occurs. In that case, the base LED at the bottom of the robot's main body turns red, orange, and yellow.
Status Message & Required Actions
I’m stuck
Relocate the robot to the location from where it starts serving.
Remove any obstacles in the robot's path and manually push the robot to reposition it.
Check if there is any foreign object in front of the camera sensor.
I’m stuck
Status Message
E-stop
Mission Failed
Screen
Required Actions
Low battery
E-stop
You can activate E-stop in case of an emergency during the robot operation. If you press the red button on the bottom of the robot, the robot will stop the operation. Turn the button in the direction of the arrow (right) to release the E-stop.
Low battery
Mission Failed
It appears when a mission fails due to various reasons.
When E-stop is activated and then deactivated during a mission.
When network or camera problems occur
When a robot gets lost, etc.
Existing missions are discarded, so return to the Home screen and start a new one.
Next Section >< Previous SectionServi Plus Manual


